
Happy National Mac & Cheese Day!!! 🎉🧀
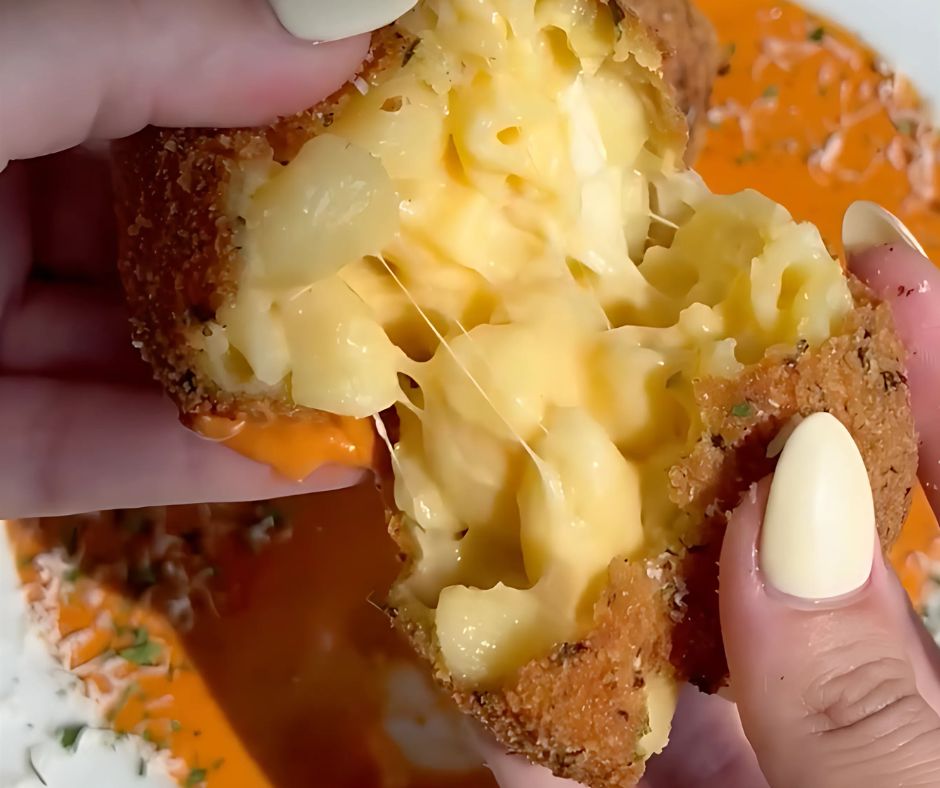
What better way to celebrate the cheesiest holiday of the year than with Fried Mac & Cheese Balls—crispy on the outside, gooey and cheesy on the inside, and basically everything your comfort food dreams are made of?
If you’ve ever stared at your leftover mac and cheese and wondered what to do with it… this is your sign. These golden nuggets of cheesy goodness are the ultimate snack, appetizer, party bite—or honestly, entire meal. No judgment here.
Let’s get into it. Because these are seriously too good to gatekeep.
Why You’ll OBSESS Over These Fried Mac & Cheese Balls
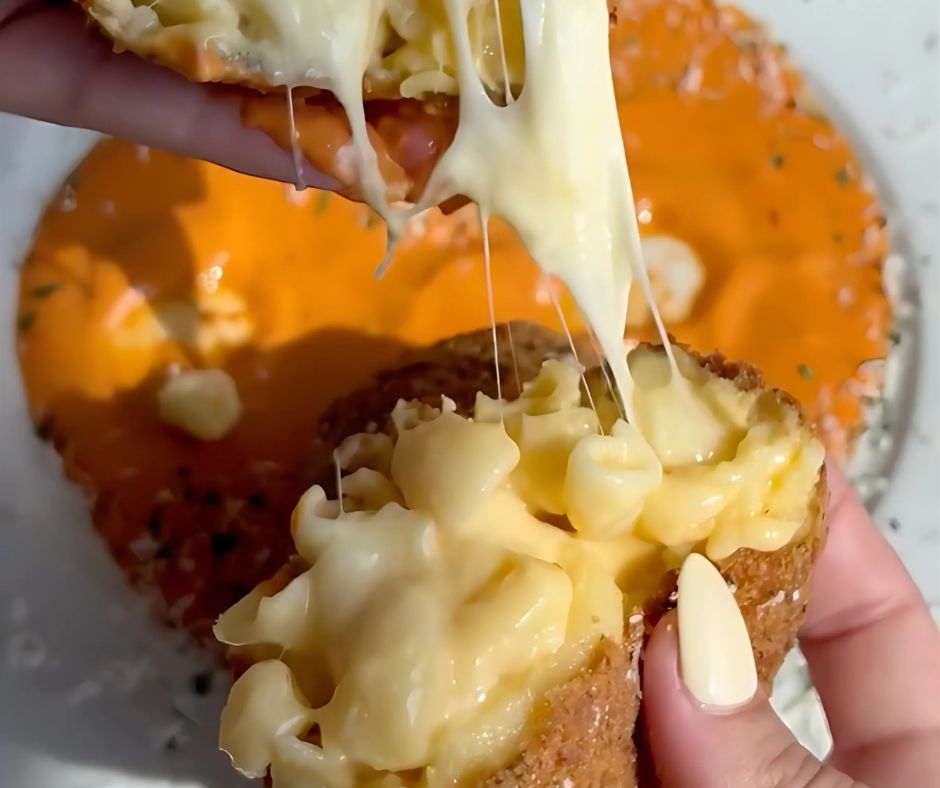
First off—if you’re already a fan of mac and cheese (and who isn’t?), just imagine that creamy, rich flavor wrapped in a super crispy breadcrumb crust. Oh, and then surprise: there’s melty mozzarella hiding in the middle. Yep, we went there.
This recipe is:
- 🔥 Crispy, cheesy, and wildly addictive
- 💯 Make-ahead friendly
- 🧀 Perfect for parties or snacking
- 🙌 Customizable based on whatever mac & cheese you have on hand
Whether you’re using classic stovetop mac, baked mac with breadcrumbs, or even a spicy jalapeño version—this recipe works. And it slaps.
Let’s Talk Ingredients
The best part? You probably already have everything you need. It starts with cold leftover mac and cheese, and the rest is pantry staples.
What You’ll Need:
- Leftover mac and cheese – Cold and firm, so it’s easier to roll into balls
- Mozzarella balls – Or chunks of mozzarella string cheese!
- Flour – For dredging and sealing the edges
- Eggs – Helps the breadcrumbs stick
- Breadcrumbs – Panko is my go-to for max crunch, but regular works too
- Salt & pepper – Always season every layer!
- Vegetable oil – For frying
- Optional toppings – Grated parm, fresh basil, dipping sauces
Pro tip: The double-coating trick makes these extra crispy. It’s totally worth it.
Step-By-Step: How to Make Fried Mac & Cheese Balls
You’re just a few simple steps away from crispy, cheesy perfection.
1. Start with cold, leftover mac & cheese
Yep—cold mac and cheese is a must here. The cooler it is, the easier it is to mold. Warm or gooey mac just won’t hold its shape.
Grab a handful, flatten it slightly, and get ready for the cheese surprise…
2. Add a mozzarella center
Place a small mozzarella ball (or a piece of mozzarella string cheese) in the center of your mac. Then roll everything into a tight ball, making sure the cheese is completely enclosed. Think of it like a cheesy treasure chest. 🧀💎
3. Freeze to set the shape
Once all your mac balls are rolled, pop them in the freezer for 30 minutes. This firms them up and makes them easier to bread and fry.
4. Time to bread your mac!
Set up a classic dredging station:
- Plate 1: Flour seasoned with salt and pepper
- Bowl 2: Scrambled eggs (about 4)
- Plate 3: Seasoned breadcrumbs
Roll each ball through flour, dip into egg, then coat in breadcrumbs. Then go back into the egg and breadcrumbs again. That second layer = the ultimate crunch.
5. Freeze again (yes, again)
Pop those breaded beauties back into the freezer for at least 1 hour. This step is key—it helps prevent the cheese from oozing out while frying.
6. Fry to golden perfection
Heat vegetable oil in a deep skillet over medium heat. Once hot, add your mac balls and fry on all sides until golden and crispy. It usually takes about 3–4 minutes per side.
Use tongs to flip and remove once perfectly browned. Place them on a paper towel to soak up any extra oil.
7. Garnish and serve!
Top your mac balls with a sprinkle of flaky salt, grated Parmesan, and a little chopped basil if you’re feeling fancy. Serve them hot with your favorite dipping sauces—think:
- Marinara
- Ranch
- Garlic aioli
- Spicy sriracha mayo
And yes, licking your fingers is totally allowed.
Pro Tips for Mac Ball Success
Wanna take these over the top? Here are a few tried-and-true tips:
✅ Use firm, cheesy mac
Creamier mac tends to fall apart when forming the balls. If your mac is too soft, mix in a bit of shredded cheddar or Parmesan to firm it up.
✅ Freeze = your best friend
It may seem like a lot of freezer time, but it’s what makes this recipe foolproof. Don’t skip it!
✅ Customize your fillings
Not a mozzarella fan? Try:
- Cream cheese and jalapeño for a spicy kick
- Sharp cheddar cubes
- Brie (yes, BRIE!) for a fancy twist
✅ Don’t overcrowd the pan
Fry in small batches so your oil temp stays consistent. That’s how you get the perfect golden crust.
Perfect for Parties, Game Day, or Just You
These fried mac balls are made for sharing—but no one says you have to. They’re:
- A hit at holiday parties
- Perfect as a late-night snack
- Loved by kids and adults alike
- Great for using up leftovers creatively
Serve them on a platter with toothpicks and sauce options, and watch them disappear in seconds.
Final Thoughts: Mac & Cheese, Leveled Up
These Fried Mac & Cheese Balls are what comfort food dreams are made of. Cheesy, crispy, golden, and totally irresistible—whether you’re making them for a party, game day, or just because you deserve it.
And hey, National Mac & Cheese Day is the perfect excuse. But honestly, do we really need a reason to celebrate mac and cheese?
Didn’t think so. 😉
So grab that leftover mac, roll up your sleeves, and get ready for the crunchiest, cheesiest, most delightful snack ever.
Love this recipe? Save it, share it, and don’t forget to tag me when you make it! 🧀💛
#KeiraRecipes #FriedMacBalls #NationalMacAndCheeseDay