Introduction
There’s something deeply comforting about baking your own bread—especially when it’s the kind of bread you can feel good about eating every day. The first time I made Greek Yogurt Seed Bread (Gluten Free), I wasn’t trying to recreate a bakery-style loaf or impress anyone with fancy techniques. I just wanted a sturdy, nourishing bread that could handle avocado, eggs, nut butter, and the occasional toast-and-jam moment without falling apart.
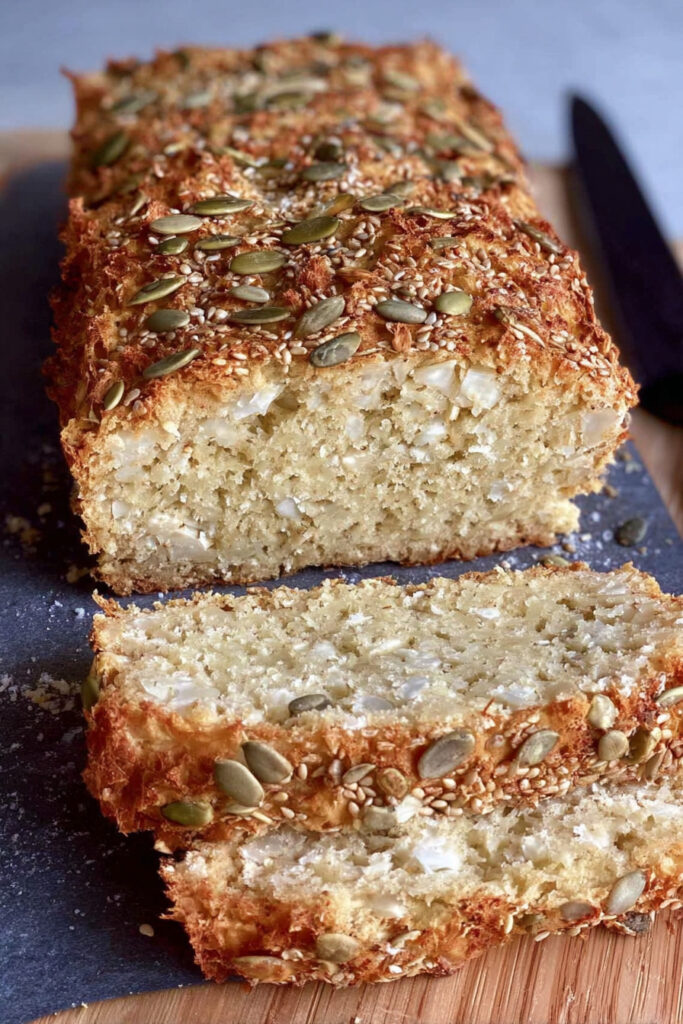
What came out of the oven was everything I hoped for and more: a dense yet tender loaf with a lightly tangy flavor from Greek yogurt, a satisfying crunch from seeds, and slices that actually hold up. No crumbling. No dryness. Just wholesome, sliceable goodness.
That’s exactly why Greek Yogurt Seed Bread (Gluten Free) has become so popular. It’s:
- Naturally gluten free
- Packed with protein, fiber, and healthy fats
- Easy to make (no yeast, no kneading)
- Perfect for sweet or savory toppings
If you’ve been searching for a gluten-free bread that feels hearty, filling, and versatile, this recipe might just become your new go-to.
Let’s bake 🍞🌱
Ingredients
This bread relies on simple, nourishing ingredients that work together to create structure, moisture, and flavor—without gluten.
Main Ingredients
- Greek yogurt (plain, unsweetened)
- Eggs
- Gluten-free oat flour (or certified GF oats, ground)
- Baking powder
- Salt
- Mixed seeds (sunflower seeds, pumpkin seeds, sesame seeds, flaxseeds, chia seeds)
- Olive oil or melted coconut oil
That’s it—no yeast, no gums, no complicated blends.
Ingredient Substitutions & Dietary Options
One of the reasons Greek Yogurt Seed Bread (Gluten Free) works so well is its flexibility.
Dairy-Free Option
- Use a thick dairy-free Greek-style yogurt (coconut or almond-based works best)
Egg-Free Option
- Use flax eggs (1 tbsp ground flax + 3 tbsp water per egg)
- Texture will be slightly denser but still sliceable
Different Flour Options
- Almond flour (use slightly less and add more seeds)
- Buckwheat flour for a deeper, earthy flavor
- Sorghum flour for mild sweetness
Seed Swaps
- Use whatever seeds you have on hand
- Hemp seeds add extra protein
- Caraway or fennel seeds add savory depth
This adaptability makes Greek Yogurt Seed Bread (Gluten Free) easy to customize to your pantry and preferences.
Step-by-Step Instructions
This is a true mix-and-bake recipe—perfect even if you’re new to gluten-free baking.
Step 1: Preheat and Prep
Preheat your oven to 350°F (175°C).
Line a loaf pan with parchment paper or lightly grease it.
Tip: Parchment paper makes lifting the bread out much easier.
Step 2: Mix the Wet Ingredients
In a large bowl, whisk together:
- Greek yogurt
- Eggs
- Olive oil
Whisk until smooth and creamy. The yogurt gives this bread moisture and a subtle tang.
Step 3: Add the Dry Ingredients
Add to the bowl:
- Oat flour
- Baking powder
- Salt
Mix until just combined. The batter will be thick—this is exactly what you want.
Step 4: Fold in the Seeds
Gently fold in your mixed seeds, reserving a small handful for topping the loaf.
The seeds provide structure, crunch, and that hearty bread feel that gluten-free loaves often lack.
Step 5: Transfer and Top
Spoon the batter into your prepared loaf pan and smooth the top.
Sprinkle the reserved seeds evenly over the surface.
Lightly press them in so they stick.
Step 6: Bake
Bake for 45–55 minutes, until:
- The top is golden and firm
- A toothpick inserted in the center comes out clean
- The loaf sounds slightly hollow when tapped
If the top browns too quickly, tent loosely with foil.
Step 7: Cool Completely
This step is crucial. Let the bread cool in the pan for 10 minutes, then transfer to a rack and cool completely before slicing.
Gluten-free bread firms up as it cools—slicing too early can cause crumbling.
Extra Tips
Serving Suggestions
This Greek Yogurt Seed Bread (Gluten Free) is incredibly versatile. Try it:
- Toasted with butter or ghee
- Topped with avocado and a soft-boiled egg
- With nut butter and honey
- As the base for open-faced sandwiches
- Alongside soups and salads
It’s hearty enough for savory meals but neutral enough for sweet toppings.
Storage & Reheating
- Room Temperature: Store wrapped for up to 2 days
- Refrigerator: Keeps well for 5–6 days
- Freezer: Freeze sliced for up to 2 months
Reheating Tip:
Toast slices straight from frozen for best texture.
Ingredient Swaps & Variations
Once you’ve mastered the base recipe, try these variations:
- Everything Seed Bread: Add garlic powder and onion flakes
- High-Protein Version: Add hemp seeds or protein powder
- Herbed Bread: Mix in rosemary or thyme
- Cheesy Seed Bread: Add grated Parmesan or dairy-free cheese
- Sweet Seed Bread: Add cinnamon and a touch of maple syrup
The base of Greek Yogurt Seed Bread (Gluten Free) is a perfect canvas for creativity.
Nutritional Information
Based on data from Hungry Happens:
https://hungryhappens.net/greek-yogurt-seed-bread-gluten-free/
Approximate per slice:
- Calories: ~140
- Protein: ~7g
- Fat: ~7g
- Carbohydrates: ~12g
- Fiber: ~3g
- Sugar: ~2g
- Sodium: ~180mg
Thanks to Greek yogurt and seeds, this bread is more filling and nutrient-dense than most gluten-free loaves.
FAQ Section
How long does it take to make Greek Yogurt Seed Bread (Gluten Free)?
About 60–70 minutes total, including baking and cooling time.
Can I substitute the Greek yogurt?
Yes. Thick dairy-free yogurt works well. Avoid thin yogurts, as they can make the bread gummy.
Can I freeze this bread?
Absolutely. Slice first, then freeze so you can toast individual pieces as needed.
Why is my bread dense?
This bread is meant to be hearty. Make sure you measure flour correctly and let it cool completely before slicing.
Is this bread good for meal prep?
Yes—it holds up beautifully and tastes even better toasted the next day.
Conclusion
If you’ve been missing a sturdy, satisfying loaf in your gluten-free kitchen, Greek Yogurt Seed Bread (Gluten Free) is here to change that. It’s wholesome, filling, and endlessly versatile—perfect for breakfast, lunch, or a simple snack.
This is the kind of bread you make once and then keep coming back to. It fits beautifully into everyday life and proves that gluten-free baking doesn’t have to be complicated to be delicious.
Give it a try, share it with a fellow bread lover, and don’t forget to leave a comment letting me know how you topped your slice. Happy baking 🍞🌱