Have you ever bitten into a Starbucks Cake Pop and wondered, “How do they make these so delicious?” These bite-sized treats are a fan favorite, combining moist cake, creamy frosting, and a smooth chocolate coating topped with colorful sprinkles. But what if you could recreate this iconic dessert at home? In this post, I’ll share an easy Starbucks Cake Pop recipe that’s perfect for birthdays, parties, or just satisfying your sweet tooth.
Whether you’re a baking novice or a seasoned pro, this guide will walk you through every step, from mixing the cake to dipping it in chocolate. Plus, I’ll share tips and tricks to ensure your homemade Starbucks Cake Pops look and taste just like the ones from Starbucks. Let’s get started!
Why Starbucks Cake Pops Are So Irresistible
Starbucks Cake Pops are more than just cake on a stick—they’re a masterpiece of texture and flavor. Here’s what makes the Starbucks Cake Pop recipe so special:
- The Cake Base: Starbucks uses a vanilla cake that’s moist but not overly dense. It’s crumbled and mixed with frosting to create a smooth, moldable consistency.
- The Frosting: The frosting acts as a binding agent, giving the cake pops their signature creamy texture.
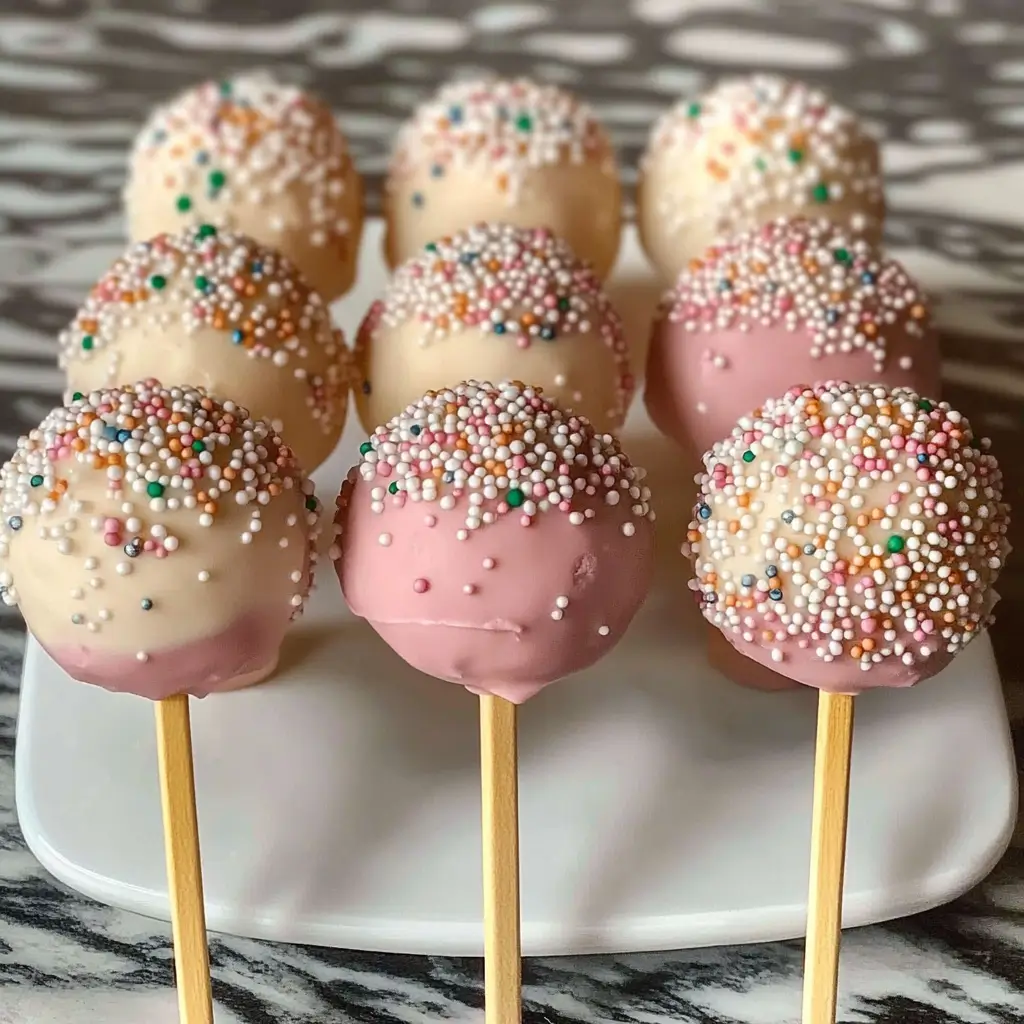
- The Chocolate Coating: High-quality white chocolate is used for the coating, creating a smooth, glossy finish that hardens perfectly.
- The Sprinkles: Colorful sprinkles add a festive touch, making them irresistible to both kids and adults.
By understanding these elements, you can replicate the magic of Starbucks Cake Pops at home.
Ingredients for Your Starbucks Cake Pop Recipe
To make Starbucks Copycat Cake Pops, you’ll need the following ingredients:
For the Cake:
- 1 box of vanilla cake mix (or bake from scratch using 2 cups flour, 1 ½ cups sugar, 1 tbsp baking powder, ½ tsp salt, ½ cup butter, 1 cup milk, 2 eggs, and 1 tsp vanilla extract)
- ½ cup unsalted butter, softened (or plant-based butter for a vegan version)
- ½ cup whole milk (or almond milk for a dairy-free option)
- 2 large eggs (or flax eggs for vegan)
For the Frosting:
- ½ cup unsalted butter, softened
- 2 cups powdered sugar
- 1-2 tbsp milk (adjust for desired consistency)
- 1 tsp vanilla extract
For the Coating and Decoration:
- 2 cups high-quality white chocolate melting wafers (or dark/milk chocolate for variation)
- ¼ cup rainbow sprinkles
- Cake pop sticks
Essential Equipment for Making Starbucks Cake Pops
What You’ll Need:
- Mixing bowls
- Hand mixer or stand mixer
- Measuring cups and spoons
- Baking pan (9×13 inches)
- Parchment paper
- Cake pop sticks
- Double boiler or microwave-safe bowl for melting chocolate
- Styrofoam block or cake pop stand for drying
Optional Tools:
- Cake pop silicone mold (for uniform shapes)
- Food processor (for finely crumbling the cake)
- Piping bag (for precise chocolate coating)
Step-by-Step Starbucks Cake Pop Recipe
Step 1: Bake the Cake
- Preheat your oven to 350°F (175°C).
- Prepare the cake mix according to the box instructions or your homemade recipe.
- Bake the cake in a 9×13-inch pan for 25-30 minutes, or until a toothpick inserted in the center comes out clean.
- Let the cake cool completely.
Step 2: Crumble and Mix with Frosting
- Crumble the cooled cake into fine crumbs using your hands or a food processor.
- In a separate bowl, prepare the frosting by beating the butter, powdered sugar, milk, and vanilla until smooth.
- Gradually mix the frosting into the cake crumbs until the mixture holds together when pressed.
Step 3: Shape the Cake Balls
- Roll the mixture into 1.5-inch balls (about the size of a golf ball).
- Place the balls on a parchment-lined tray and chill in the refrigerator for 30 minutes.
Pro Tip: Chilling prevents the cake balls from falling apart during dipping.
Step 4: Dip and Decorate
- Melt the white chocolate in a double boiler or microwave, stirring until smooth.
- Dip the tip of a cake pop stick into the melted chocolate and insert it into a cake ball. This helps secure the stick.
- Dip the entire cake ball into the chocolate, tapping off excess.
- Immediately sprinkle with rainbow sprinkles before the chocolate sets.
- Place the cake pops upright in a styrofoam block or cake pop stand to dry.
Tips for Perfect Starbucks Cake Pops
- Avoid Crumble Chaos: If your cake mixture is too dry, add a bit more frosting. If it’s too wet, add more cake crumbs.
- Smooth Dipping: Use a deep, narrow container for dipping to ensure even coating.
- Sprinkle Strategy: Add sprinkles quickly before the chocolate hardens. For a neater look, use a piping bag to drizzle extra chocolate on top.
- From Scratch Option: If you prefer not to use boxed cake mix, bake a vanilla cake from scratch using the ingredients listed above.
Creative Variations for Your Starbucks Cake Pop Recipe
Why stop at vanilla? Here are some delicious variations to try:
- Chocolate Lovers: Use chocolate cake and dark chocolate coating.
- Red Velvet: Pair red velvet cake with cream cheese frosting.
- Vegan Version: Use plant-based butter, milk, and flax eggs.
- Gluten-Free: Substitute with gluten-free cake mix and flour.
How to Store Your Starbucks Cake Pops
- Room Temperature: Store in an airtight container for up to 2 days.
- Refrigerator: Keep in the fridge for up to 1 week.
- Freezer: Freeze for up to 1 month. Thaw at room temperature before serving.
Nutritional Information for Starbucks Cake Pops
Each Starbucks Copycat Cake Pop contains approximately:
- Calories: 150
- Fat: 8g
- Carbs: 18g
- Protein: 2g
Final Thoughts on Making Starbucks Cake Pops at Home
Making Starbucks Copycat Cake Pops at home is easier than you think! With this Starbucks Cake Pop recipe, you can enjoy the same delicious flavors and festive look without leaving your kitchen. Whether you’re hosting a party or just treating yourself, these cake pops are sure to impress.
So, what are you waiting for? Grab your ingredients and start baking! Don’t forget to share your creations on social media and tag us—we’d love to see your masterpiece.
Got questions? Leave a comment below, and I’ll be happy to help!
Happy baking! 🎉