Okay, let’s be honest…
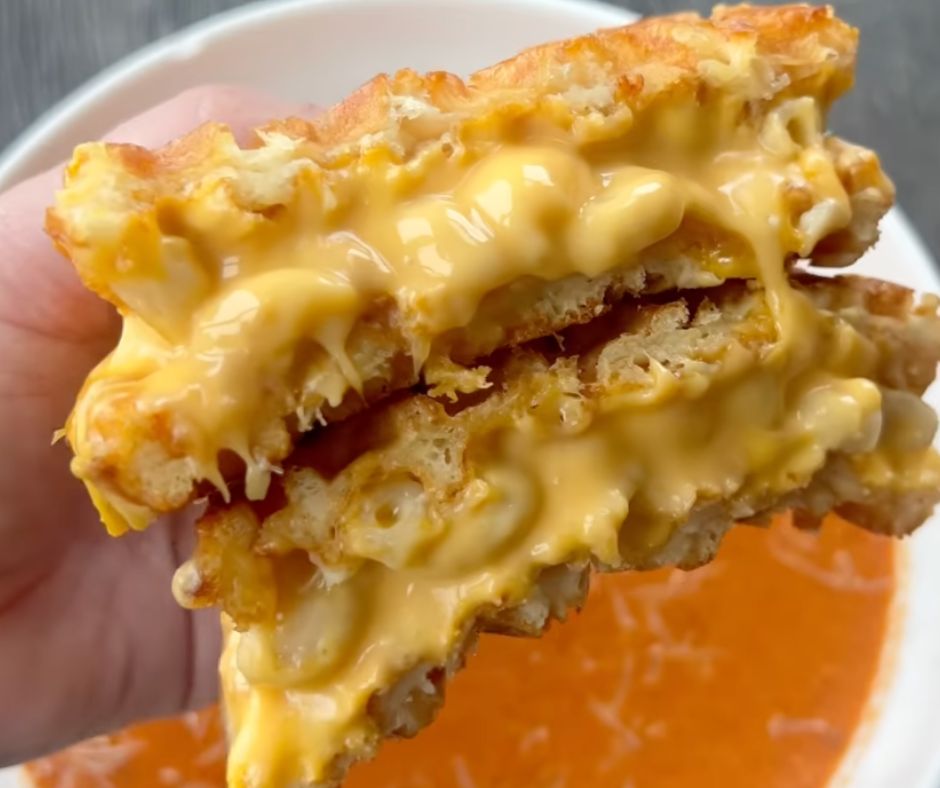
Grilled cheese and tomato soup already have a chokehold on our comfort food cravings. But what if I told you they could get even better? Like, next-level, cheesy-melty magic better? That’s exactly what happened when I whipped up this Mac & Cheese Grilled Cheese with Cheesy Waffles—and y’all, I’m never going back.
Instead of plain ol’ bread, I used high-protein, gluten-free Cheesy Waffles (yep, you heard that right!) as the base. Think crispy edges, melty centers, and flavor for days. Layer in a mountain of creamy mac & cheese, double the cheese slices, and grill it to golden perfection. Paired with tomato soup? Chef’s kiss.
Let’s dive into this dreamy sandwich and break down everything you need to know—from why it works to how to make it flawlessly every single time.
🛒 Ingredients You’ll Need
This recipe is pretty simple, but the flavor is out of this world. Here’s what you’ll need:
- 2 Cheesy Waffles (I found mine at Whole Foods – high-protein and gluten-free!)
- 2 tablespoons butter
- 4 slices of melty cheese (American, cheddar, or gouda are 🔥)
- ½ cup mac & cheese (homemade or leftover—no judgment here)
- Tomato soup (optional, but highly encouraged)
Pro Tip: Can’t find cheesy waffles at the store? You can totally DIY them with a protein waffle mix + shredded cheese. It’s worth the extra step if you’re craving that crispy-savory base.
🧀 Why This Combo Works (And Why You’ll Be Obsessed)
Here’s the thing: grilled cheese is already iconic. But swapping bread for waffles? That’s where the genius begins.
- Texture heaven: The crispy ridges from the waffles give this sandwich that extra crunch while still being soft enough inside to soak up all that melty cheese.
- Cheese ×2: Between the mac and the cheese slices, you’re basically living your best dairy dream.
- Protein boost: Using high-protein waffles means you get a hearty, satisfying meal without the food coma.
- Gluten-free friendly: Whether it’s a lifestyle or a necessity, this version has your back.
It’s like a warm hug in food form. Cozy, nostalgic, and fun with a capital F.
🔥 How to Make Mac & Cheese Grilled Cheese with Cheesy Waffles
Here’s how to bring this delicious monster to life in under 15 minutes.
Step 1: Toast Your Waffles
Start by toasting your waffles in the oven or toaster until they’re golden brown and crisp. This helps them hold up to all the melty goodness that’s about to go down.
Keira tip: Lightly toasting prevents sogginess later. No one wants a floppy sandwich!
Step 2: Butter + Sizzle
Heat 2 tablespoons of butter in a pan over medium heat. Once it’s melted and bubbling, it’s time to start stacking.
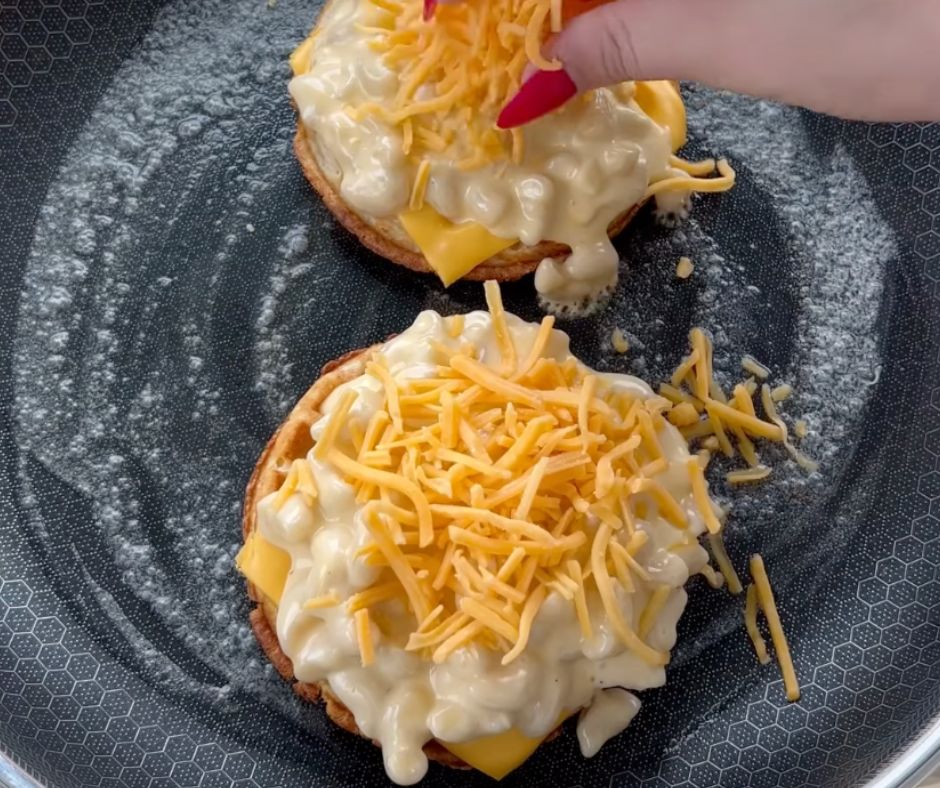
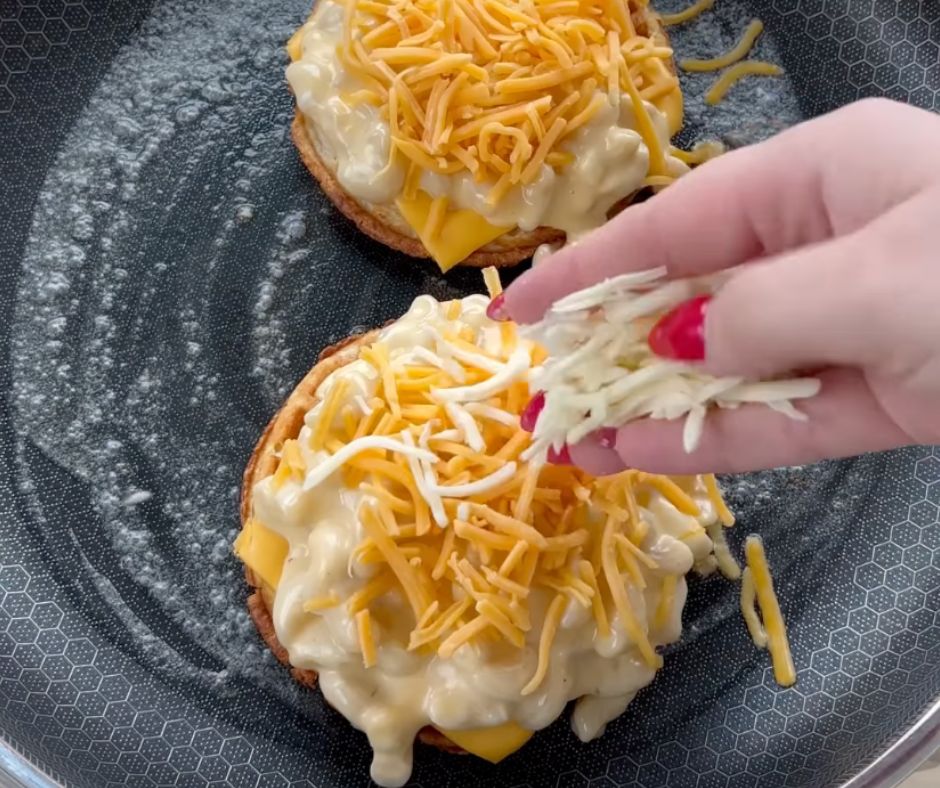
Step 3: Layer It Up
Add your crispy waffle to the pan, then start layering:
- A slice of cheese
- A generous scoop of creamy mac & cheese
- Another slice of cheese (because more is more)
- Top it off with your second waffle
Cover the pan with a lid to let everything steam and melt together for a few minutes. This creates that gooey melt that dreams are made of.
Step 4: Flip & Finish
Gently flip your sandwich and cook until both sides are beautifully browned and the cheese is oozing out. It’s giving golden, crispy, cheesy perfection.
Step 5: Serve with Tomato Soup (Duh)
Slice that bad boy in half and serve it up with your favorite tomato soup. Dip it, swirl it, savor it.
🧇 Variations & Swaps
You can totally customize this grilled cheese based on your vibe. Here are a few fun twists:
- Spicy kick? Add jalapeños or use pepper jack cheese.
- Extra protein? Throw in a few slices of turkey or crispy bacon.
- Vegan version? Use vegan cheese and plant-based mac & cheese with dairy-free waffles.
- Sweet & savory? Drizzle a tiny bit of hot honey inside. It sounds weird, but it’s so good!
💬 Keira’s Kitchen Notes
I first made this sandwich on a rainy Sunday when I needed something warm, comforting, and totally over-the-top. I had a leftover container of mac & cheese and a box of cheesy waffles staring at me from the fridge. And bam—this crazy idea was born. I didn’t expect it to be that good, but ohhh was I wrong.
The buttery waffle edges, the double-layered cheese, the creamy pasta center—it all comes together in the most indulgent, satisfying way. I’ve made it three times since and shared it with friends who were all shooketh.
This is the kind of recipe that doesn’t just fill your stomach—it brings pure, unfiltered joy. ❤️
📦 Storing & Reheating Tips
Let’s be real—you’re probably going to eat the whole thing in one sitting. But in case you’ve got leftovers:
- Store: Wrap tightly in foil and keep in the fridge for up to 2 days.
- Reheat: Pop it back in a skillet or air fryer to crisp it back up. Avoid the microwave if you want to keep that golden texture!
🔍 SEO + FAQs
Can I use frozen waffles?
Absolutely! Just toast them well first. Bonus points if they’re cheesy or savory.
What’s the best cheese to use?
American cheese melts like a dream, but cheddar, gouda, or even fontina work beautifully too.
Is this kid-friendly?
Totally! Kids LOVE the cheesy combo, and it’s fun to eat. Just skip any spicy additions.
Is it really gluten-free?
Yes—if you use certified gluten-free waffles and mac & cheese, this whole meal is celiac-safe.
❤️ Final Thoughts: You Need to Try This
This Mac & Cheese Grilled Cheese with Cheesy Waffles is a game-changer. It’s cozy, crispy, creamy, and packed with flavor—and it’s honestly easier to make than it looks.
Whether you’re serving it up for lunch, a lazy weekend dinner, or your next brunch get-together, this sandwich is going to steal the show. Trust me: one bite, and you’ll never look at regular grilled cheese the same way again.
Don’t forget to tag me if you try it! 📸 I love seeing your creations and drooling over your cheese pulls. #KeiraRecipes