Introduction
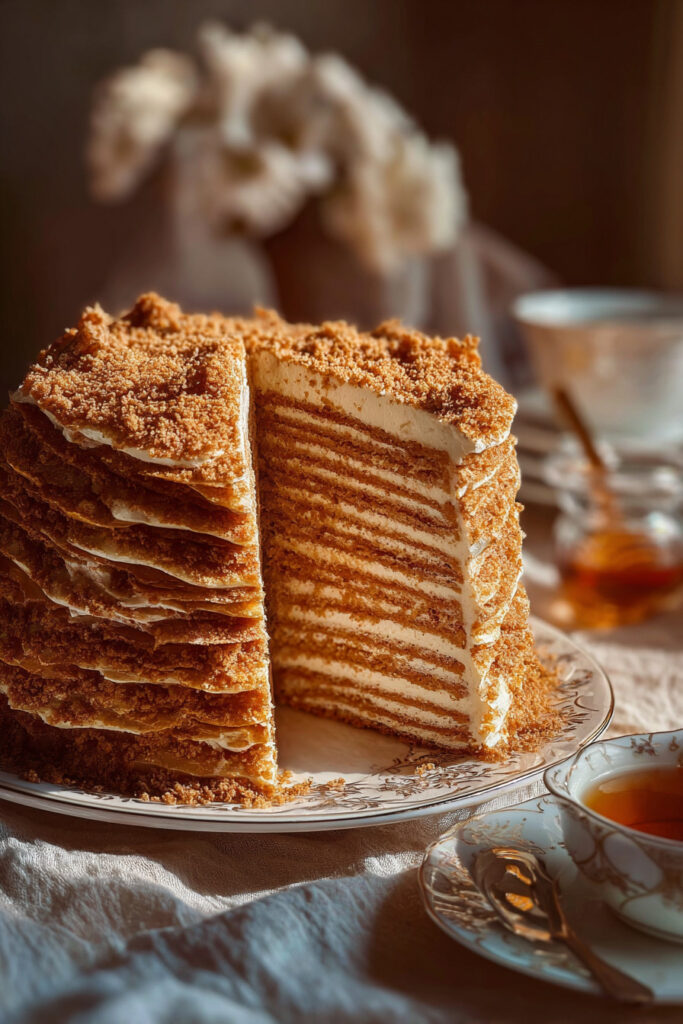
If there’s one cake that instantly makes me smile, it’s Russian Honey Cake—also known as Medovik. With its thin, delicate layers of honey-infused sponge and silky cream filling, this cake is a showstopper at any table.
I first tasted Russian Honey Cake at a friend’s holiday party. There it was: a tall, golden cake with countless layers, looking almost too pretty to eat. But the moment I took that first bite—soft, slightly chewy cake mingling with luscious cream—it was pure magic. Each layer had absorbed just enough filling to become tender, while still holding its shape beautifully.
What makes Russian Honey Cake truly special is its balance: not overly sweet, with subtle honey notes and a tangy cream that gives it a light, elegant finish. Though it looks elaborate, this cake is surprisingly beginner-friendly once you break it down step by step.
This classic dessert has a rich history, dating back to 19th-century Russia, when it was made for the imperial family. Today, it’s enjoyed across the world as a beloved celebration cake, perfect for birthdays, holidays, or whenever you want to wow your guests.
📝 Ingredients
Here’s what you’ll need to make your own stunning Russian Honey Cake. Don’t worry—everything is easy to find, and I’ve included substitution ideas too.
For the Cake Layers
- ½ cup (170g) honey (preferably floral or wildflower for rich flavor)
- ¾ cup (150g) granulated sugar
- 2 tablespoons unsalted butter
- 3 large eggs
- 1 teaspoon baking soda
- 3½ cups (450g) all-purpose flour, plus more for rolling
For the Cream Filling
- 4 cups (960ml) sour cream (full-fat for best texture)
- 1½ cups (180g) powdered sugar
- 1 teaspoon pure vanilla extract
Substitution & Variation Ideas
- 🍯 Honey: Use a high-quality raw honey for deeper flavor, or try buckwheat honey for a more robust, almost molasses-like note.
- 🥚 Eggs: For a vegan option, swap each egg for a flaxseed “egg” (1 tbsp ground flax + 3 tbsp water per egg, let sit 10 mins).
- 🌿 Flour: Use a 1:1 gluten-free baking blend to make the cake gluten-free.
- 🍶 Sour Cream: Greek yogurt works as a substitute, though it gives a slightly tangier flavor.
👨🍳 Step-by-Step Instructions
Let’s break it down. Making Russian Honey Cake involves two main parts: baking the thin layers and preparing the cream filling. Then, it’s all about layering and chilling to perfection.
Step 1: Make the Honey Mixture
In a heatproof bowl set over a pot of simmering water (double boiler style), whisk together the honey, sugar, and butter until smooth and melted.
Add the eggs, whisking constantly to avoid scrambling. Continue to cook and whisk for 5–7 minutes, until the mixture turns a lovely caramel color and thickens slightly. This step develops that signature deep honey flavor.
Step 2: Add the Baking Soda
Remove the bowl from heat and quickly whisk in the baking soda. The mixture will foam up—this is good! It creates a light texture in the cake layers.
Step 3: Incorporate the Flour
Gradually stir in the flour until a soft, sticky dough forms. It should be pliable but not overly firm. If needed, add a bit more flour, a tablespoon at a time.
Wrap the dough in plastic wrap and let it rest for 15–20 minutes. This makes it easier to roll out.
Step 4: Roll and Bake the Layers
Preheat your oven to 350°F (175°C). Line two baking sheets with parchment paper.
Divide the dough into 8 equal portions (you can do more for a taller cake). On a lightly floured surface, roll each portion into a thin round, about 8 inches in diameter. A cake pan or plate makes a great template—place it on top and trim the edges for a clean circle.
Bake each layer for 5–7 minutes, or until golden brown. They bake quickly, so keep an eye on them! Transfer to a wire rack to cool completely. Keep the scraps—they’ll be your crumb coating later.
Step 5: Make the Cream Filling
While the layers cool, whisk together sour cream, powdered sugar, and vanilla extract in a large bowl until smooth. The mixture should be creamy and spreadable—not runny. If it feels too loose, chill it for 10–15 minutes.
Step 6: Assemble the Cake
Place your first cake layer on a serving plate. Spread a generous layer of cream over the top, then place the next cake layer on top. Repeat until all layers are stacked.
Coat the top and sides with the remaining cream, smoothing it out with a spatula.
Step 7: Add the Crumb Coating
Take your baked scraps and blitz them in a food processor until finely ground. Sprinkle the crumbs over the top and sides of the cake for that signature look and a delightful texture.
Step 8: Chill Overnight
Here’s the key: Russian Honey Cake needs time to rest. Cover it and refrigerate overnight (or at least 8 hours). This allows the cream to soak into the cake layers, turning them tender and almost custard-like.
Trust me—this step transforms your cake from good to unforgettable.
🌟 Extra Tips
Serving Suggestions
- Decorate with fresh berries, edible flowers, or a drizzle of honey for a beautiful presentation.
- Serve slices with hot tea, coffee, or even a glass of sparkling wine for a festive touch.
Storage & Reheating
- Fridge: Store the cake in an airtight container in the refrigerator for up to 5 days.
- Freezer: You can freeze the fully assembled cake for up to 2 months. Thaw overnight in the fridge before serving.
- No reheating needed, since it’s served chilled.
Ingredient Variations
- Add a layer of chopped walnuts or toasted hazelnuts between the cake layers for crunch.
- For a twist, flavor the cream with lemon zest or a splash of liqueur like amaretto or cognac.
🧮 Nutritional Information
(Based on NYT Cooking’s Russian Honey Cake recipe)
Per serving (1 slice, assuming 12 servings):
- Calories: 430
- Protein: 6g
- Fat: 24g
- Carbohydrates: 49g
- Sugar: 29g
❓ FAQ Section
Q: How long does it take to make Russian Honey Cake?
A: The active prep time is about 1 hour, plus baking and cooling. The cake needs at least 8 hours of chilling (ideally overnight), so plan ahead.
Q: Can I substitute sour cream with something else?
A: Yes! Greek yogurt or a mix of whipped cream and cream cheese can work, but the texture and tang will differ slightly.
Q: Can I freeze Russian Honey Cake?
A: Absolutely. It freezes beautifully. Wrap it tightly and freeze for up to 2 months. Thaw overnight in the fridge before serving.
🏁 Conclusion
There’s something truly magical about a dessert that combines elegance with old-world charm. Russian Honey Cake is just that—a cake that looks like it came from a pastry shop but carries the warmth of homemade baking.
Every layer tells a story: the caramelized honey dough, the creamy tangy filling, and the way they meld together overnight into a soft, dreamy texture. Whether you’re making it for a special occasion or simply to treat yourself, this cake will impress every time.
If you try this Russian Honey Cake recipe, I’d love to hear about it! Leave a comment below, share your photos, and tag me on social media. 🍰✨
Good food is meant to be shared—so share this recipe with friends who love a baking challenge that ends in sweet victory.